
Zelda by Designer Pearl Red Moon


'Zelda' by Pearl Red Moon 
Recently, I was very fortunate to have been chosen as a pattern tester for designer Pearl Red Moon - Boho Banjo Art To Wear. I should say firstly that I don't usually make garments although I can operate a sewing machine and that I am very short in stature, so regular patterns need to be significantly altered. However, as one of the pattern testers, I  made "Zelda" exactly according to the instructions.
http://boho-banjo-art-to-wear.myshopify.com/
This is a great pattern for those of us who don't fit "exactly" the normal  commercial sizes - aren't we in the majority?  It is a loose fitting, contemporary and stylish top. I loved the design  because it's "different" and can look as conservative or as funky as you like depending on your choice of fabrics. My choice of fabric ? I must admit just before closing time one day late in December, I ran into a fabric shop and chose two of the small range of available stretch fabrics which I thought may go together . The next time I make this pattern I might give myself a little more time to think about my choices, and of course  I am so tempted to purchase the stunning unique prints by Pearl herself. 

'Zelda' pattern by Pearl Red Moon, sewn by me. 


Two of Pearl's fabulous fabric designs  available from her Spoonflower shop, la_perla http://www.spoonflower.com/profiles/la_perla


back of "Zelda" 
This was a very easy pattern to make - all the pattern pieces fitted together perfectly. The hardest part of this pattern was taping the A4 printed sheets together .... but this has even be solved as Officeworks now offers a service of printing patterns/diagrams/designs onto large sheets. This would certainly save time, but I had no problem printing off at home the pages of the PDF pattern and as each page was clearly marked and numbered, it was just a matter of being patient enough to put the pages together in order ( and making sure you have enough sticky tape before you start!) .  The sewing was easy and the instructions are clear. I don;t have a lot of experience making clothing and I experienced no difficulty in constructing "Zelda" .  As you can see from the photos, Zelda turned into a tunic for me , but remember I said I am very short. If I were to make this again, I don' t think I would try to change the pattern length at all ... I particularly love wearing tunics, so would just  create Zelda Tunic #2.  This garment has to be one of the most comfortable and easy to wear - you can move with confidence in "Zelda" -  I would suggest that you even feel like dancing when you wear a "Zelda" creation. 
My Zelda tunic
Zelda - comfortable and easy wearing
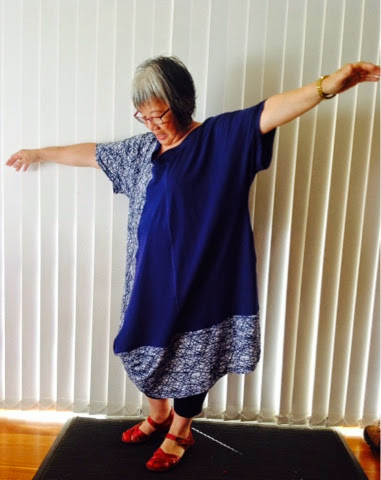
 "Zeld'' in motion 
Pearl Red Moon's pattern is certainly value for money - only $14! I think it is both fun to make and wear with the bonus of a unique bespoke addition to your wardrobe. Thank you, Pearl!

Important links : 
Purchase your downloadable PDF pattern from Boho Banjo Art to Wear 

Purchase your designer fabric from  la-perla Spoonflower shop http://www.spoonflower.com/profiles/la_perla

Comments

  1. Very nice, Wilma. I think I'll add this pattern to my wish list!

    ReplyDelete

Post a Comment

Thanks for reading my blog and please share your thoughts about my blog post by leaving a comment.Your comment won't appear immediately as comments are verified before publication in an effort to reduce the amount of spam appearing. Anonymous comments will not be published.

Popular posts from this blog

Too Precious to Waste

 Stitched tea bags/ old doily "tea lights" - Wilma Simmons  More than a year ago, a decision was made.  The annual exhibition of NCEATA ( Newcastle Creative Embroiderers and Textile Artists) 2015-2016 will have the theme "Mottainai". Mottainai in Japanese refers to more than just physical waste (resources). It is even used to refer to thought patterns that give rise to wasteful action. Grammatically, it can be used in Japanese as an exclamation ("mottainai!") or as an adjective phrase ("it feels mottainai"). There is no plural form. The collection of mottainai things could be called mottainai koto ( もったいない事 ? ). As an exclamation ("mottainai!") it means roughly "what a waste!" or "Don't waste." [2]  A simple English equivalent is the saying "waste not, want not." A more elaborate meaning conveys a sense of value and worthiness and may be translated as "do not destroy (or lay waste to) that

Fish and Sticks : Art Dolls

This week I've been working on fish and sticks ....  The sticks are the message stick art dolls which were very popular, attracting some attention and a few orders at the Wise Women exhibition. Each of the message stick dolls are from the Wise Women series, each with her own personality and  message of wisdom, handwritten on a handmade timber tag. I gather the sticks during my walks around my neighbourhood and the tags are made from special bits of timber, some collected by me or  my husband or from off cuts gifted to us  from another doll making friend whose husband makes bagpipes. These dolls start off very simply with a wrap around a stick, in the general shape of a body. 'Naked" message stick dolls - strips of wadding wrapped around found sticks.   Then I usually wrap other layers of fabric, wool, and/or fibres, over which I do some simple embroidery. I sculpt  or mould small face masks for these dolls. I really like using "sari ribbon" as wrapping str

Wednesday's Child /2

Work in Progress - 3 of the 193 for "Stitched Up"- Wilma Simmons   The work for the "Stitched Up " Project  continues. See the previous "Wednesday Child" post for the background to this art project celebrating the 150th anniversary of the Newcastle Industrial School. I have been documenting the progress of my work, so I thought it might be interesting to share some of the early stages of the "stick dolls" ... Here are some of the beginning steps.. Sticks collected while walking the bushland in my neighbourhood  Drying and getting rid of any insects - oven heat 75 degreesC for approx 1-2 hours.  Trimmed and cut if necessary  Ends sealed with matte sealing solution.  Drying  - solution goes on white but dries clear.  First wrapping - foil to create a body shape  Second wrapping - stretch fabric.  Third wrapping - fabric strips  Some stitching - more stitching and embellishment to come.  Follow thi